Timer Alarm is a timer program for Android devices. While visually plain, the app has many useful features. It allows you to have multiple countdown timers active simultaneously. You can choose how you want to be notified when a timer expires - with a sound, flashing screen or vibrating the device, or any mix of the three. You can save frequently used timer settings and recall them easily. Alarms will be persistent through device reboots too.
The screenshots for this manual were taken from the Android emulator running Android 4.0 (Ice Cream Sandwich) and 4.3.1 (Jellybean) and a tablet running Android 4.4.2 (KitKat). They might be slightly different than what you see when running the app on your device but the controls should work similarly. These screenshots also have a blank space in places where you would normally see advertisements.
This app uses a chime recorded by Mike Koenig distributed by the soundbible.com website under the Attribution 3.0 license.
This app uses SeekBar preference code from lukehorvat.com.
Find the Timer Alarm icon on your home screen or in the Apps list and press it.
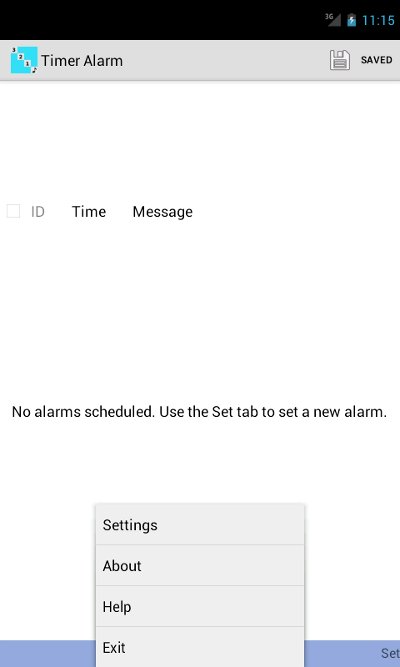
When the app is launched it will take you to the main Timer Alarm screen. There are two tabs on the screen as shown on the bottom of the screen, a Pending tab and a Set tab. The Pending tab shows all active timer alarms. The Set tab allows you to set a new alarm. When initially launched on a regular sized device, you will be looking at the Pending tab, and if there are no active timer alarms you will see a message saying to use the Set tab to schedule a new alarm.
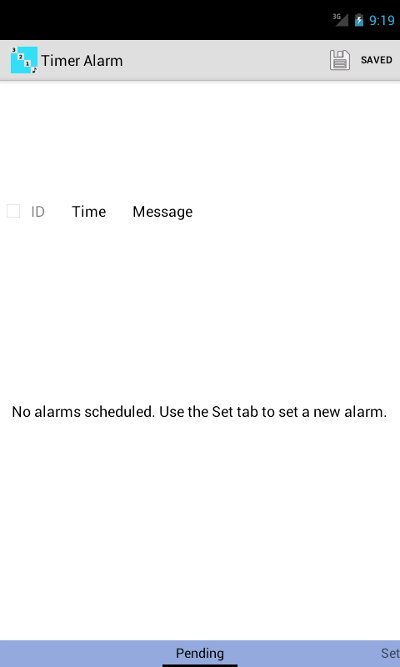 |
You can switch between the Pending and Set tabs by swiping left or right, or touching the "Pending" or "Set" tab labels at the bottom of the screen.
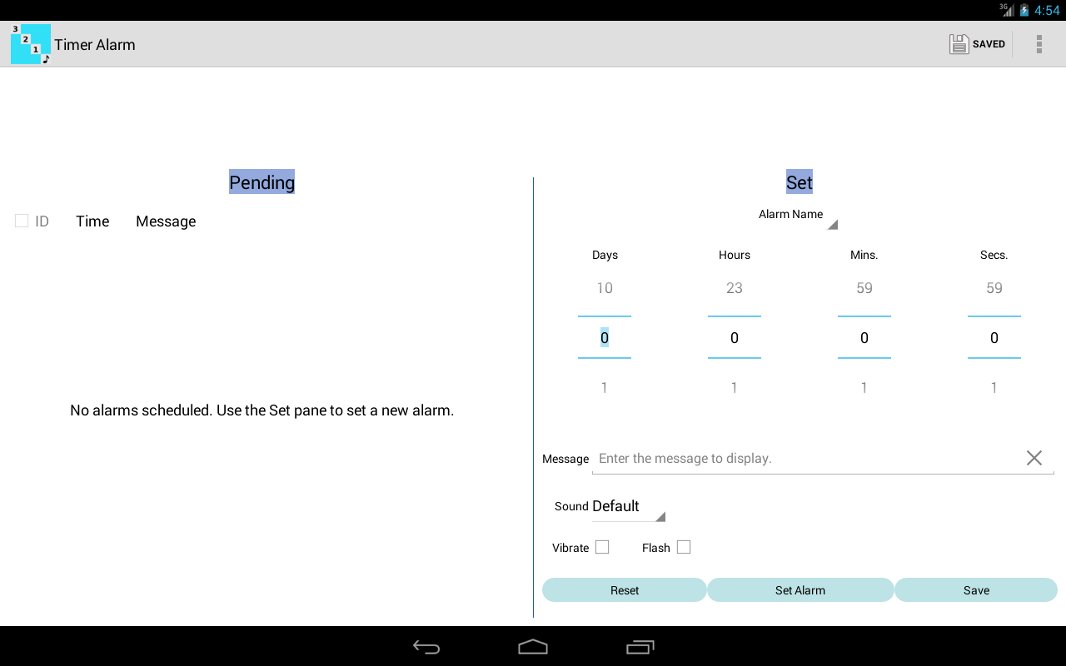
For devices which Android classifies as "very large", both the Pending and Set tabs will be shown as side by side panes when the device is in landscape orientation. The app will work exactly the same on regular displays and the large displays, only the layout of the main screen is different.
 |
The Set tab on the main Timer Alarm screen is where you can schedule a new alarm. In the main screen, go to the Set tab by swiping left or pressing the "Set" tab name at the bottom of the screen. The Set Alarm screen has controls to set the time for the alarm, a message to display and other alarm settings.
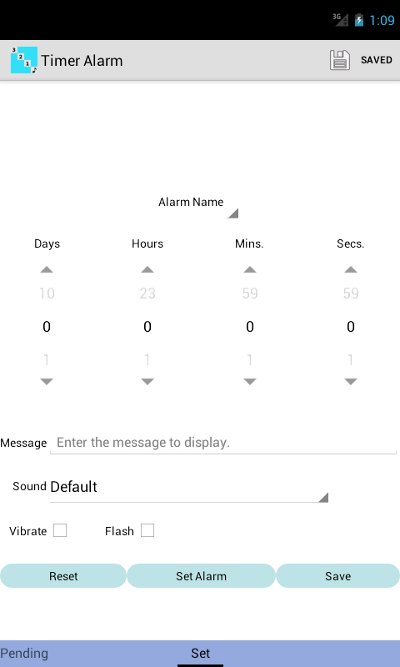 |
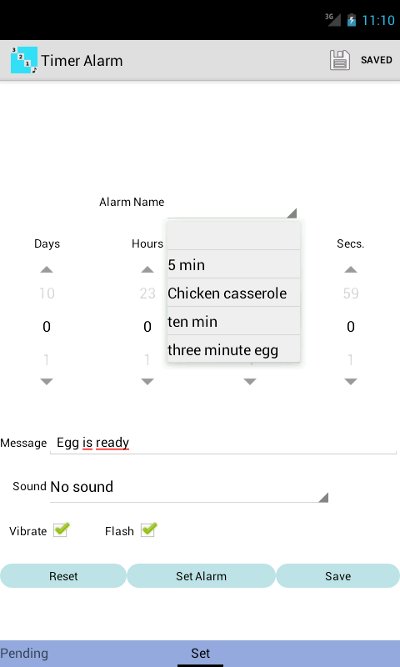
At the top is an Alarm Name drop-down box with the current alarm's name. This can be used to select an alarm from the list of saved alarms (see Saved Alarms). If there are no saved alarms the drop-down box will display a blank entry.
Use the number wheels to set the days, hours, minutes and seconds into the future for the alarm. (A note about the Day field - it is really the number of 24-hour periods, not exactly "days." For example, if on the day before your local timezone enters daylight savings time and skips ahead 1 hour, you set an alarm for 1 day at 9:00am your alarm will expire at 10:00am the next day.)
You can enter some text in the Message field to be displayed when the alarm expires. If necessary, you can enter multiple lines of text in this field. If you are using a software keyboard you need to press the Back button to stop entering text. You can leave this field blank if you don't need any message with your notice. (See Setting An Alarm By Commands to see how to enter english words into the Message field to set the alarm controls.)
Use the Sound drop-down box to select the sound to play when the alarm expires. You can use Default to play the default chime that comes with Timer Alarm, or No sound to not play any sound. You can also select any other alarm sounds on your device. When you select a sound, a 2 second sample of the sound will be played.
Touch the Vibrate checkbox to vibrate the device when the alarm goes off. (If your device is not capable of vibration this will be disabled.) Touch the Flash checkbox to show a flashing background on the screen when the alarm goes off.
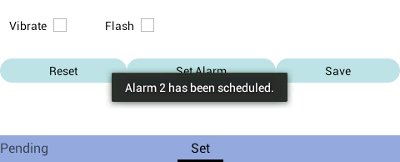
At the bottom are three buttons. Reset will reset all the controls to their default settings. The action of Set Alarm depends on whether you set the alarm controls manually or are using commands to set the alarm controls. When setting manually, pressing Set Alarm will schedule the alarm. You will see a brief notice at the bottom of the screen when it is scheduled. When you schedule an alarm it is given an ID number; in the screenshot the alarm was assigned number 2.
 |
When using commands to set the alarm controls (e.g. when the Message field starts with the words "timer set") the first press of the Set Alarm button will set the alarm controls according to the commands given in the Message field. The second press will schedule the alarm. See the Setting An Alarm by Commands section for more info.
If you will be using the current alarm settings frequently, the Save button will save this alarm's settings so you can retrieve them later (see Saved Alarms). You will be asked to give a name to this alarm.
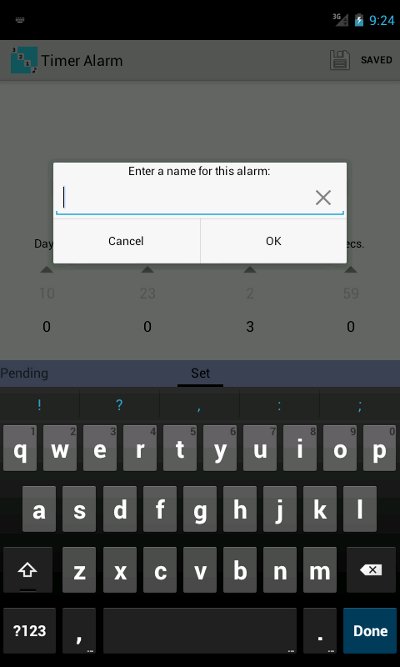 |
Enter a name and press OK. The alarm's time, the message, sound, flash and vibrate settings will saved under the given name. You will see a brief notice at the bottom when the alarm is saved.
Once an alarm has been scheduled with the Set Alarm button you can leave the app and even turn off your device. If one or more alarms expire while your device is turned off you will get a notification about it when your device is turned back on.
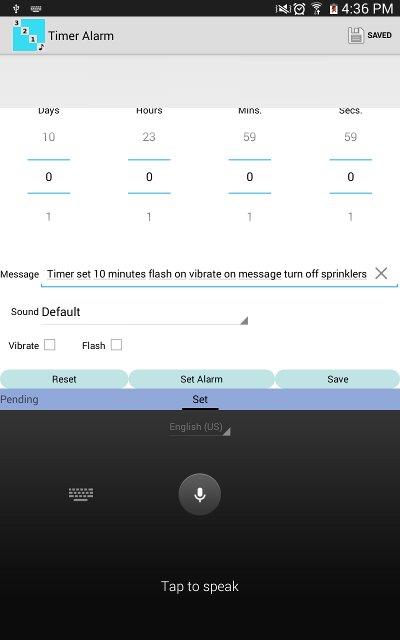
It is possible to set the alarm controls using english words entered into the Message field. The best way to use this feature is to use a software keyboard that allows voice input - then you can set the controls by voice command.
Timer Alarm can only recognize certain words and the order of the words is important. First, the first words in the Message field must be "timer set". Then come the commands to set the time and the vibrate and flash settings. Following that is the sound selection command and finally the message command. All of these commands are optional. The following sections give details on the exact words and structure allowed for these commands.
You can set the time by giving a number followed by the words "days", "hours", "minutes" or "seconds". For example: "4 hours 30 minutes". Note that you do not have to go in order from days to seconds, you can give the time units in any order. When you set the time, any time unit you did not specify will be set to zero. The singular form of the time units may be used too: "1 minute 3 hours 20 seconds" will set the time controls to 0 days and 3:01:20.
Set the flash and vibrate options by using the keywords "flash" and "vibrate" followed by "on" or "off". Either "flash" or "vibrate" may appear first and both are optional. Examples: "flash on vibrate off", "vibrate on", "vibrate off flash off".
Another way to turn off the flash and vibrate settings is to use the "no flash" and "no vibrate" commands. Here too, when specifying both settings the order does not matter.
If the flash and/or vibrate settings are not specified they will retain their current settings.
Use the "sound" keyword followed by "none" for no sound, or "default" for the default chime, or words from a name of one of your alarms. For example, if your device has an alarm named Walk in the forest alarm, you can use "sound walk forest" to select it (assuming there isn't another alarm with the words walk and forest). The only caveat is that you cannot use the word "message" to identify an alarm because that is a keyword (described in the next section).
To prevent any sound from playing when the alarm expires use the "sound none" or "no sound" commands.
The speech recognizer sometimes confuses the words "found" and "sound", so Timer Alarm will accept "found" as a substitute for the "sound" keyword.
As mentioned earlier, if the sound command is specified for an alarm it must either be the last command or the next to last command (with the message command being last). If a sound is not specified the sound setting will retain its current value.
The "message" keyword indicates the beginning of the message to display when the alarm expires. Any words after the "message" keyword will remain in the Message field after the first press of the Set Alarm button.
If the message command is used it must be the last command given.
Timer set 3 minutes no flash no vibrate
This will set the time to 0+0:03:00 and turn off the flash and vibrate settings. The sound setting will stay the same and there will not be a message when the alarm expires since neither the "sound" nor "message" commands were given.
Timer set 20 seconds 2 hours flash on sound default message 2 hours later
This will set the time to 0+2:00:20, turn on the flash setting, set the sound to the default chime and set the message to "2 hours later." The vibrate setting will retain its current value.
Timer set 2 minutes 30 seconds
This will set the time to 0+0:02:30. The flash, vibrate and sound settings will retain their current values. The message field will be empty.
Timer set sound none message silent alarm
This will set the sound setting to "No sound" and the message will be set to "silent alarm". The time, flash and vibrate settings will retain their current values.
Timer set vibrate on one minute no sound
This will set the time to 0+0:01:00, turn vibration on and set the sound to "No sound". The flash setting will retain its current value and the message field will be blank.
Timer set 3 minutes flash on sound sea breeze message time is up
This will set the time to 0+0:03:0, turn flashing on and set the sound to the alarm in this device called "Sea breeze alarm". The vibrate setting will retain its current value and the message field will be set to "time is up".
Now here are some bad examples. These will not do what you expect.
Timer set sound none 2 minutes flash on
This will not work because the sound command is specified before the time and flash settings. The "sound" command must be the last or second to last command when "message" is also specified.
Timer set 30 seconds message time is up sound default
This will not work because the message command is specified before the sound. The "message" command must be the last command.
Timer set thirty five minutes vibrate on
For numbers above ten you need to use numerals. For this example replace "thirty five" with "35".
Once the command is entered into the Message field, press the Set Alarm button to process the command and set the alarm controls. Any words that are unrecognized will be silently skipped. The commands will be removed from the Message field, leaving only the message to display when the alarm expires (if a message was given with the "message" keyword). Check the controls to see if they were set correctly, then press Set Alarm again to schedule the alarm.
 |
 |
Alarms that are frequently used can be saved and recalled later. As mentioned in the Setting an Alarm section, you can save an alarm with the Save button from the main screen's Set tab. When you want to use a saved alarm there are two ways of doing so.
The first way is from the main screen's Set tab's Alarm Name drop-down box. This box will have the names of all the saved alarms in alphabetical order (ignoring case). Selecting an alarm from this drop-down box will set the controls to the values for that alarm.
 |
The second way to recall a saved alarm is from the Saved Alarms screen. From the Timer Alarm main screen press the Saved button on top to get to the Saved Alarms screen.
In this screen you can see the list of saved alarms. The list is arranged alphabetically by the name of the alarm. Each entry shows the name of the alarm, then the alarm's settings.
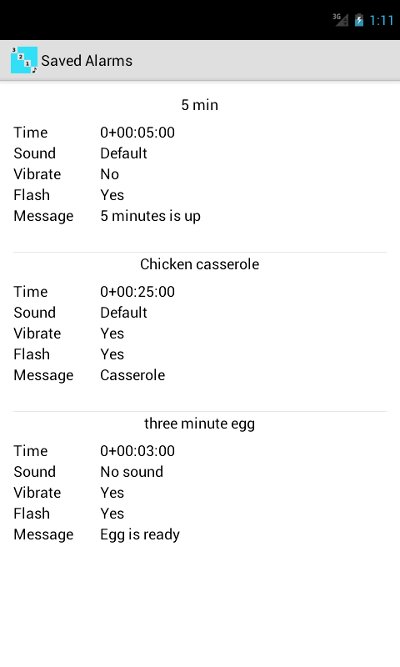 |
Touching an entry will select that entry - you will go back to the Set tab in the main screen and the fields will be set from the selected alarm. Note that it does not schedule the alarm; you must press the Set Alarm button to schedule it.
The Saved Alarms screen also allows you to delete saved alarms. To remove an entry from the list, touch and hold the entry until it becomes shaded and you see the delete option on the action bar at top.
 |
Press the Delete button on the action bar to delete the entry, or press Done to cancel. When an entry has been deleted you will see a brief notice at the bottom of the screen.
To return to the main screen without choosing an entry just press the Back button on your device.
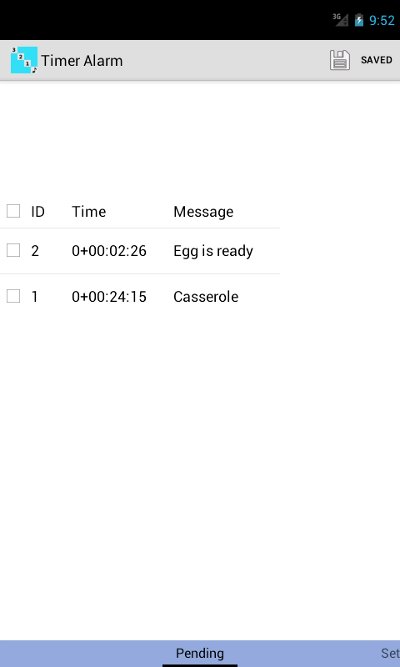
When you launch Timer Alarm on a regular sized device you see the Pending tab of the main screen. On a large device in landscape mode you will see the the Pending pane on the left side of the main screen.
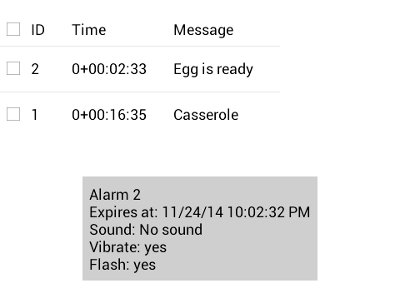
When you have one or more alarms scheduled, this tab/pane shows the alarm ID number, the time to expiration and the message for the alarm, for each of your pending alarms. The list is arranged according to the alarm expiration time.
 |
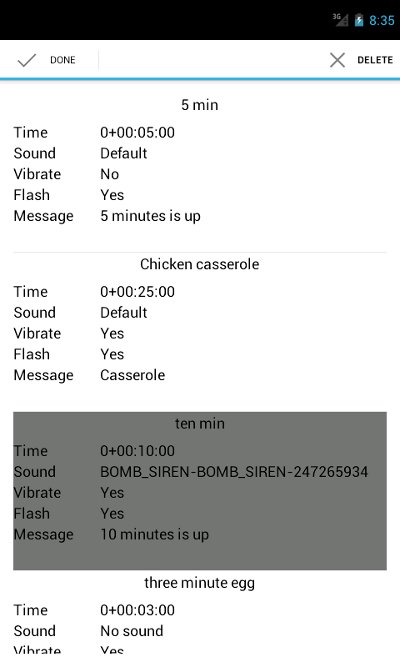
To show the details of an alarm do a long press on the alarm. A small window will appear showing the expiration time for the alarm and the sound, vibration and flash settings. The window will disappear in about 5 seconds.
 |
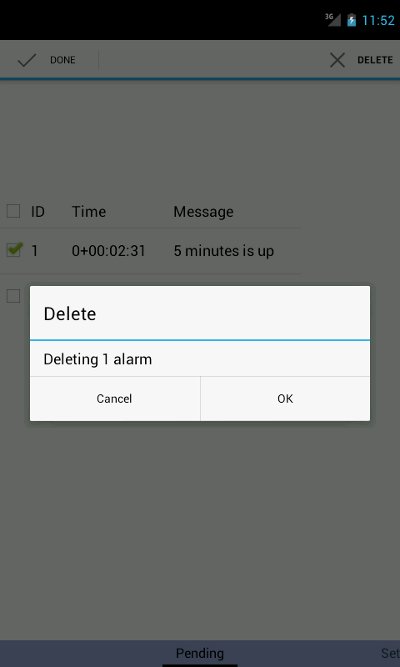
You can cancel an alarm from the Pending tab of the main screen. Touch the checkbox to the left of the alarm(s) that you want to cancel. When one or more boxes are checked, a Delete button appears on the action bar at the top.
Press the Delete button and you will get a confirmation dialog. Press the OK button to remove the selected alarm(s).
 |
When an alarm expires you will see the Alarm screen.
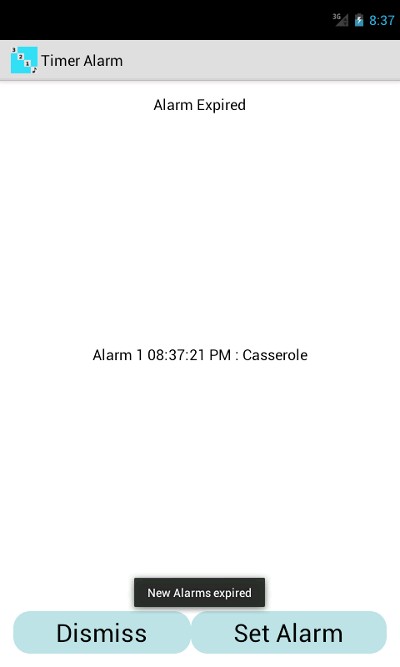 |
The screen tells you the ID number of the alarm that expired, the time that it expired and shows the alarm's message (if any). If more alarms expire while in the Alarm screen, those alarms' information will be added to the screen. Anytime an alarm expires you will see a brief "New Alarms expired" notice at the bottom.
If the alarm's sound setting was not set to "No sound", the alarm's sound will be played in a loop. If the alarm's flash setting was turned on (or the "Always flash" setting is on) the background will flash alternately a light and dark color. Similarly, if the alarm's vibrate setting was turned on (or the "Always vibrate" setting is on) the device will vibrate periodically.
To go back to your previous activity before the alarm expired, press the Dismiss button or press the Back button on your device. If you want to set another alarm press the Set Alarm button - it will take you to the Set Alarm screen to schedule another alarm.
The Alarm screen will be displayed for up to 2 minutes. If you take no action to dismiss the screen, after 2 minutes it will dismiss itself and set a notification that an alarm expired. This notification is the same as what you get when an alarm expires while the device is off, as described below.
Note that once you leave the Alarm screen in any way (pressing Dismiss or Set Alarm buttons, Back button, Home button, another app taking control), you cannot get back to it. It is not kept in Android's history list.
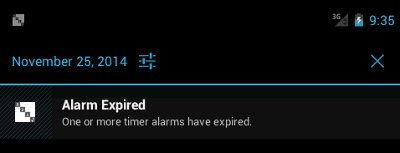
If an alarm expires when your device is turned off, when the device is turned on again your will see a notification that alarms have expired. A Timer Alarm icon will appear in the status bar or notifications area.
Opening the notifications drawer shows the Timer Alarm notification.
 |
Pressing the notification will take you to the Pending Alarms screen where you can see which alarms have expired.
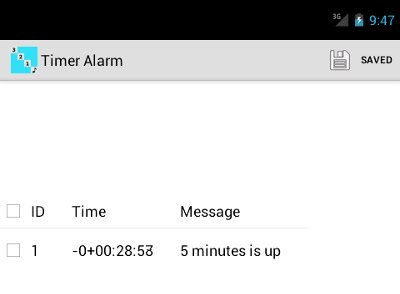 |
You can delete the expired alarms here. If you don't, the next time another timer alarm expires they will be automatically deleted.
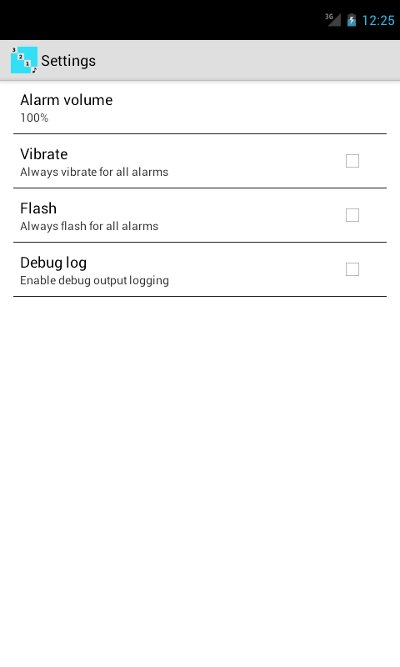
In the Settings screen you can change some alarm preferences. Get to the Settings screen by pressing your device's menu button (or the menu icon on the action bar for devices without a menu button) while in the main or Saved Alarms screens. Choose the "Settings" menu item from the menu.
 |
The Settings screen has options to adjust the alarm volume, set the flash and vibrate settings for alarms and save debugging information.
 |
Touching the Alarm volume item brings up a slider to control the alarm volume.
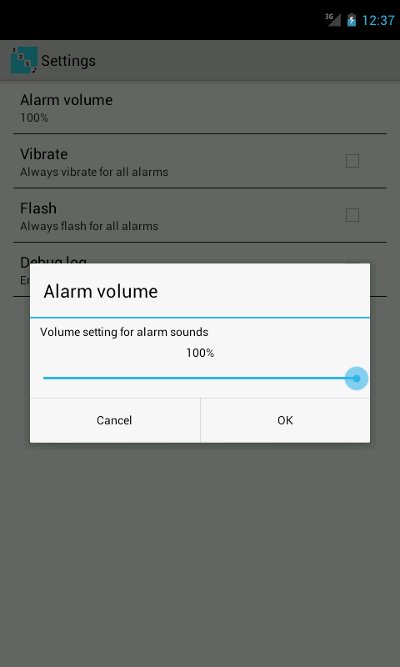 |
Android maintains separate system volume controls for different things such as music, notifications, alarms, etc. The Alarm volume setting does not control the system's alarm volume, it only controls the volume for this app's alarms. Setting it to 100% means that Timer Alarm will play the alarm sounds at the maximum volume allowed by the system for alarms. Another example: if the system alarm volume is set to 80% and the Timer Alarm volume is set to 70% the alarms will be played at 56% volume.
Your device may contain a way to set the system alarm volume. If not, there are several apps in the Play store to do that.
Once you set the volume slider and press the OK button the app will play the currently selected alarm sound at the set volume for a couple of seconds.
The Vibrate setting controls whether to always vibrate the device when an alarm expires. This setting overrides the alarms' vibrate settings when turned on. When turned off, the device will vibrate only if the vibrate option was selected for an alarm. Turn the setting on or off by touching the checkbox at the right.
The Flash setting controls whether the screen will always flash colors when an alarm expires. Like the Vibrate setting, this will override the alarms' flash settings when turned on.
The Debug log setting should only be turned on if there is a problem with the app on your device and you are asked to collect a debug log to mail to the developer. Otherwise, leave this setting off.
If you have any questions or comments about Timer Alarm please send an email to coderys@coderys.com.
© Yasantha Samarasekera 2017
$Id: c9991e9b3df6208d233fcdcb12e75eb83455dc25 $