NOTICE
This version of Food Log is not the latest version. Please see the Food Log info page here for the newest version.
Food Log is an Android app to help keep track of what you eat. You make "entries" in the log every time you eat or drink. Each entry contains the date and time and (optionally) which foods you ate. You can attach notes to the entries if you require.
If you want to keep track of your calories you can enter the calories per serving for each food. Food Log will calculate the calories for each entry by looking at the calories for each food in the entry and the number of servings for the foods.
You can even enter the ingredients for each food and use the notes section to store the recipe for making the food.
How detailed you want to get is up to you. It is not required to enter calories or ingredients for foods, or even to enter foods for the entries. Obviously, some of the functions of the app will not work if don't enter the required information. For example, if you don't enter ingredients for foods you won't be able to search for entries or foods by ingredient.
The screenshots in this document were taken from an Android tablet running Android 4.4.2 (KitKat). They might be slightly different than what you see when running the app on your device but the controls should work similarly.
This app uses the Caldroid widget from github. See this link for Caldroid copyrights and licenses.
This app uses the OpenCSV library from sourceforge. See this link for the OpenCSV license.
Icons and app store graphics were made with clip art from
openclipart.org. Specifically the following images were
used:
Pencil
Notebook
White plate
Restaurant
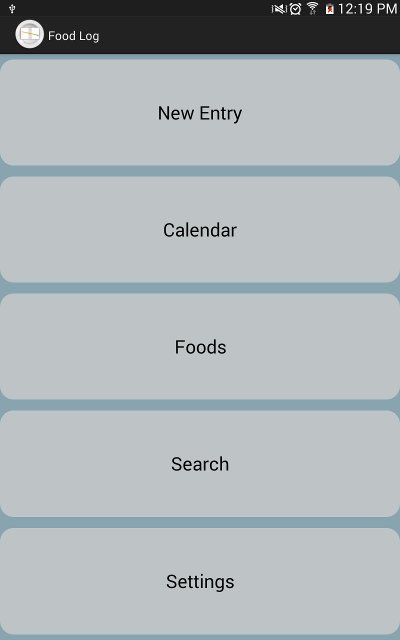
When the app is launched it will take you to the main screen.
 |
The New Entry button lets you create a new log entry. The Calendar button shows a calendar with all your log entries. The Foods button lets you enter new foods or search for existing foods. With the Search button you can find entries in the log based on certain criteria. The Settings button allows you to adjust your daily calorie limits.
In addition to those buttons you can press the menu button (either on the screen or the menu button on the device) for more options.
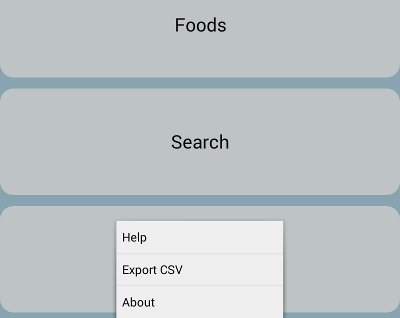 |
The Help menu item appears in the options menu in every screen. It will launch a web browser that shows this help text.
If you want to look at the whole Food Log database you can choose the Export CSV option. It writes a CSV (comma separated values) file called "foodlog.csv" containing the foods and entries in the database. Many programs such as Excel, Open Office and others can display these files.
The About displays some information about Food Log.
Exit from the app by pressing the device's Back button from the main screen. An ad will be shown before exiting the app.
An Entry in the log records the date and time you ate or drank along with the foods you had. The Entry Editor screen looks like this:
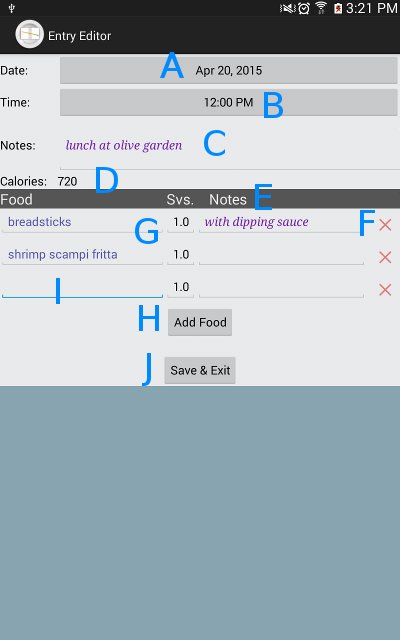 |
To change the entry's date press the button displaying the date (A). Similarly, change the entry's time by pressing button showing the time (B). If you want to enter any notes about this specific entry put them in the text box (C). The calorie counter (D) is calculated automatically from the foods you enter.
The second part of the screen (E) is for entering the foods you had. Each row is divided into 3 sections - the name of the food or drink, the number of servings, and any notes you want to record for that food. At the very right is a red "X" (F) - press that to remove the food from the entry.
If you are editing an existing entry instead of creating a brand new entry, the foods for the entry will be shown (G). You cannot change the name of these foods, you can only change the number of servings and notes, or you can delete the food.
To add a new food to the entry press the Add Food button (H). You will get new blank row where you can enter the food name, servings and notes (I).
If you want to enter a food's details like calories and ingredients you can do it directly from the Entry Editor by long-pressing the name of the food. This will take you to the Food Editor. You can also update food details by going to the Food Search screen and looking up the food to edit it.
To exit from the Entry Editor press the Save & Exit button (J). This saves any changes made to the entry and returns to the previous screen. You can also return to the previous screen by press the Back button on your device. If you have made changes to the entry you will get a chance to save them.
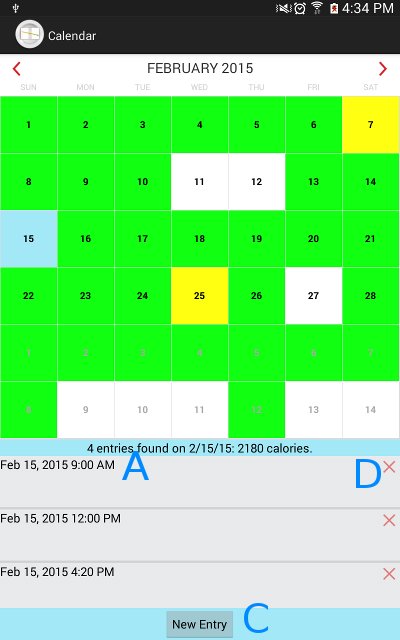
The calendar screen shows your entries in a calendar format. If you have set your daily calorie limits (see Settings) the days will be color coded according to the number of calories consumed each day - green if under your normal calorie limit, yellow if over your normal limit and under your high limit, and red if over your high limit. If you have not set any calorie limits, any day with entries are colored green. Any day without entries will be white.
 |
You can navigate through the calendar by swiping the calendar left or right or pressing the left or right red arrows at the top (A).
From the calendar screen you can look at entries for any date. Touch a date and the entries for that date will show in the bottom part of the screen (or the right part of the screen when in landscape orientation).
 |
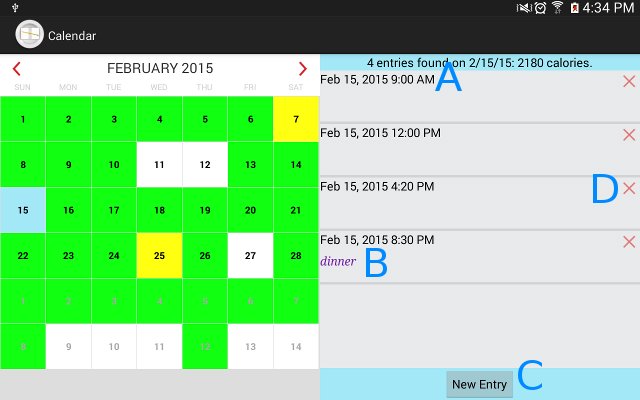 |
The times for the entries are shown (A) along with any notes for the entries (B). To edit an entry touch the entry's time (A). That will take you to the Entry Editor to change the entry.
To create a new entry for the date press the New Entry button at the bottom (C). That will take you to the Entry Editor with the date set to the selected date and the time set to noon. You can adjust the time within the editor.
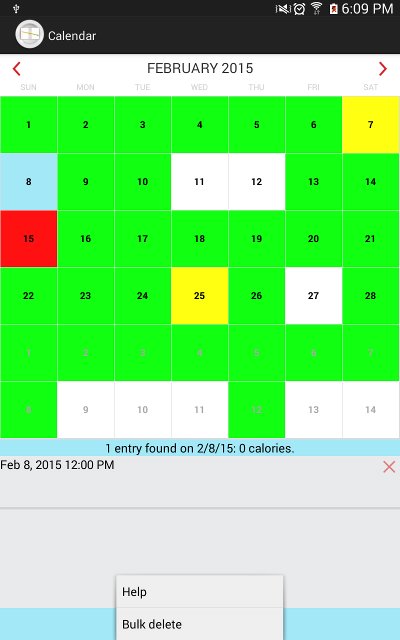
To delete an entry press the red "X" at the right (D). To delete all old entries prior to a certain date, touch the date on the calendar, then press the menu button on your device (or the options menu button on the action bar) and choose the Bulk Delete option.
 |
If you touch a date in the calendar without any entries (a white colored square), Food Log assumes you want to create a new entry for that date and takes you to the Entry Editor.
The Foods screen allows you to add new foods or search for existing foods.
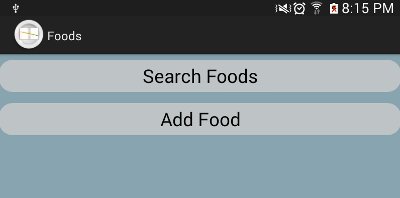 |
The Search Foods button will bring up the Food Search screen. The Add Food button will bring up the Food Editor to create a new food in the database.
In the food search screen you can look up the foods in the Food Log database by the food's name or an ingredient name that is contained in the food.
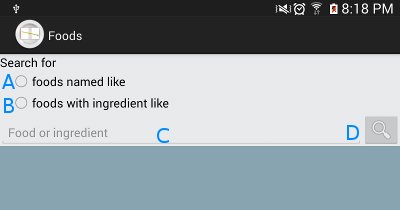 |
Press the (A) radio button to look up foods by name, or press the (B) radio button to look up foods by ingredient name. Then enter the food or ingredient name in the text field (C). The name can be a whole name or part of a name. Case doesn't matter as all foods and ingredients are converted internally to lower case. Then press the search button (D). The search results will show up below the text field.
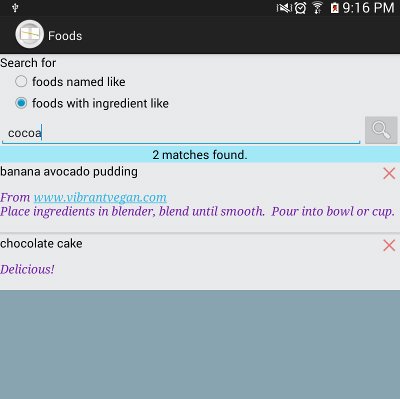 |
Touching the name of a food from the results will bring up that food in the Food Editor. Note that you must touch the name of food, otherwise the touch might not register. This is especially true when the food contains a long note attached to it.
To delete a food touch the red "X" at the right of the food. If a food you want to delete is used in any entries you are not allowed to delete it, you will just get an informational dialog saying how many entries have that food in them.
In the Food Editor you can create new foods or edit the details of existing foods.
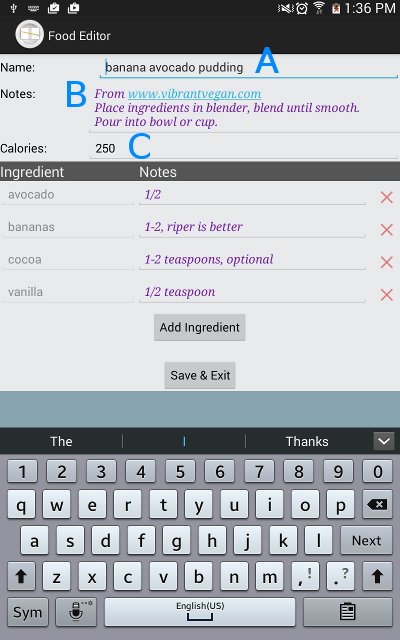 |
The Food Editor works much like the Entry Editor. At the top is a text field for the name of the food (A). You don't need to capitalize names of foods or ingredients since all food and ingredient names are converted to lower case in the database. If you enter the name of a food that is already in the database you will be given the option to edit that food.
Enter any notes for the food in the text field (B). Enter the calories per serving in the text field (C).
The second part of the screen is for the ingredients contained in the food. Each row is divided into two sections, the ingredient name and any notes about how this ingredient is used in this food. At the right of each row is a red "X" - press this to remove the ingredient from this food. Press the Add Ingredient button to add a new ingredient row.
When editing an existing food, you cannot change the names of any ingredients already associated with that food. You can change the notes for those ingredients or you can remove them. You can add new ingredients to existing foods too.
Bear in mind that Food Log only requires a food name; all other food details are optional. If you don't enter other details like calories and ingredients you cannot use some of Food Log's functions, but they are not required.
To save your changes and return to the previous screen press the Save & Exit button. You can also return to the previous screen by pressing the Back button on your device. If you have made changes you will get a chance to save them or abandon them.
The search screen allows you to search for entries by date, notes, foods or ingredients.
 |
To search by dates press the "Search by date range" checkbox (A), then press the Start Date button (B). This will bring up a window to select a date.
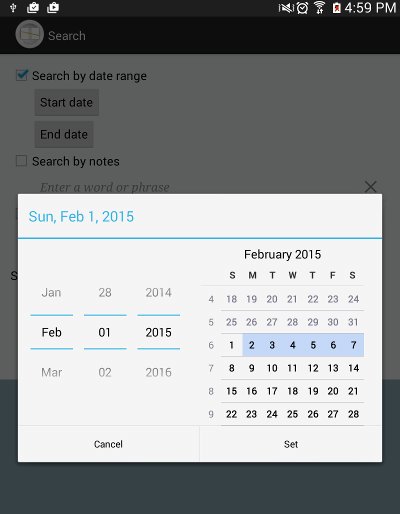 |
After selecting the date press the Set button; both the starting and ending dates will be set to the selected date. If you want to change the ending date press the lower button (C) and select another date. Food Log will search for all entries between the starting and ending dates when you press the Search button.
To search by notes press the (D) checkbox and enter the word or phrase for which to search in the text field below (E). Case does not matter. All the notes will be searched - entry notes, food notes and ingredient notes. Searching by notes will be slower than searching by date range or food/ingredient.
To search by food or ingredient press the (F) checkbox and then press the the Add Food/Ingrd. button (G) to add a text field where you can enter the name of a food or ingredient. Unlike in the food search, here the name must be the full name, it cannot be a partial name. Case does not matter.
If you enter more than one food / ingredient to search for, be aware that ALL must match as either foods OR ingredients. They cannot match some at the food level and some at the ingredient level. For example, if you search for entries that contain "chicken" and "celery", an entry will match if it contains foods "chicken" and "celery" OR it contains foods which have the ingredients "chicken" and "celery". If an entry contains the food "chicken" and a food "soup" which contains the ingredient "celery", that entry will not match.
You can combine search options. For example you could search for entries within a date range containing a certain food.
You can view the search results in the calendar or as a list. Choose how you want the results displayed by clicking the (H) or (I) radio buttons. Then press the Search button at the bottom to start your search and see the results.
The calendar showing search results works basically the same as when showing all entries (see Calendar).
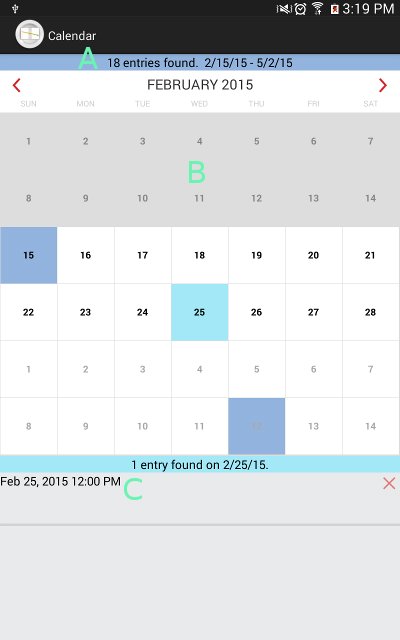 |
When showing search results the very top will have information about how many matches were found and the date range in which the matches occurred (A).
Dates with matching entries are colored dark blue. Press on a date to see the list of matching entries for that date. Touch an entry's time (C) to view or edit the entry's details in the Entry Editor. Delete an entry by touching the red "X" at the right of the entry.
When displaying search results in the calendar, calorie counts and the New Entry button are not displayed. Also, dates outside the matching date range are not selectable (shown grayed out (B)).
The other way to show search results is in a list.
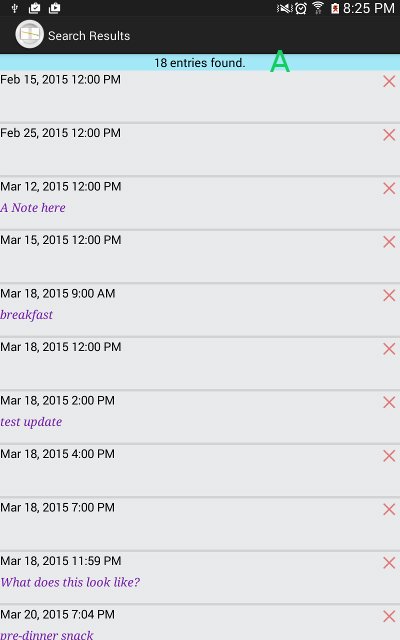 |
The top line (A) shows how many matches were found. As in the bottom part (or in landscape orientation, the right half) of the calendar, touch the entry's time to view or edit the entry's details in the Entry Editor. Delete an entry by touching the red "X" at the right of the entry.
In the settings screen you can set your calorie limits.
 |
Touch the "Normal Calorie Limit" or "High Calorie Limit" rows to set each one respectively. They are initially set to 0, and you can leave them like that if you do not want Food Log to color code your calendar dates. Alternatively, you can set only the "Normal Calorie Limit" and leave the "High Calorie Limit" at 0. In that case the calendar will show days over the normal calorie limit in yellow and ones under the limit in green.
© Yasantha Samarasekera 2017
$Id: c147f8dd5e40785c9bb01ed1bd7aac51e6aa18c0 $